Mastering Sublimation Mug Printing for Your Small Business
Sublimation mug printing isn't just a way to stick a design on a cup; it's a professional process where your art becomes a permanent part of the mug itself. Using special dye-based ink, heat, and pressure, the design is infused directly into the mug's surface. This creates a vibrant, photo-quality finish that will never peel, crack, or wash away, which is why it's the go-to method for small businesses, Etsy sellers, and makers crafting high-quality custom gifts and merchandise.
Building Your Foundation for Flawless Mugs
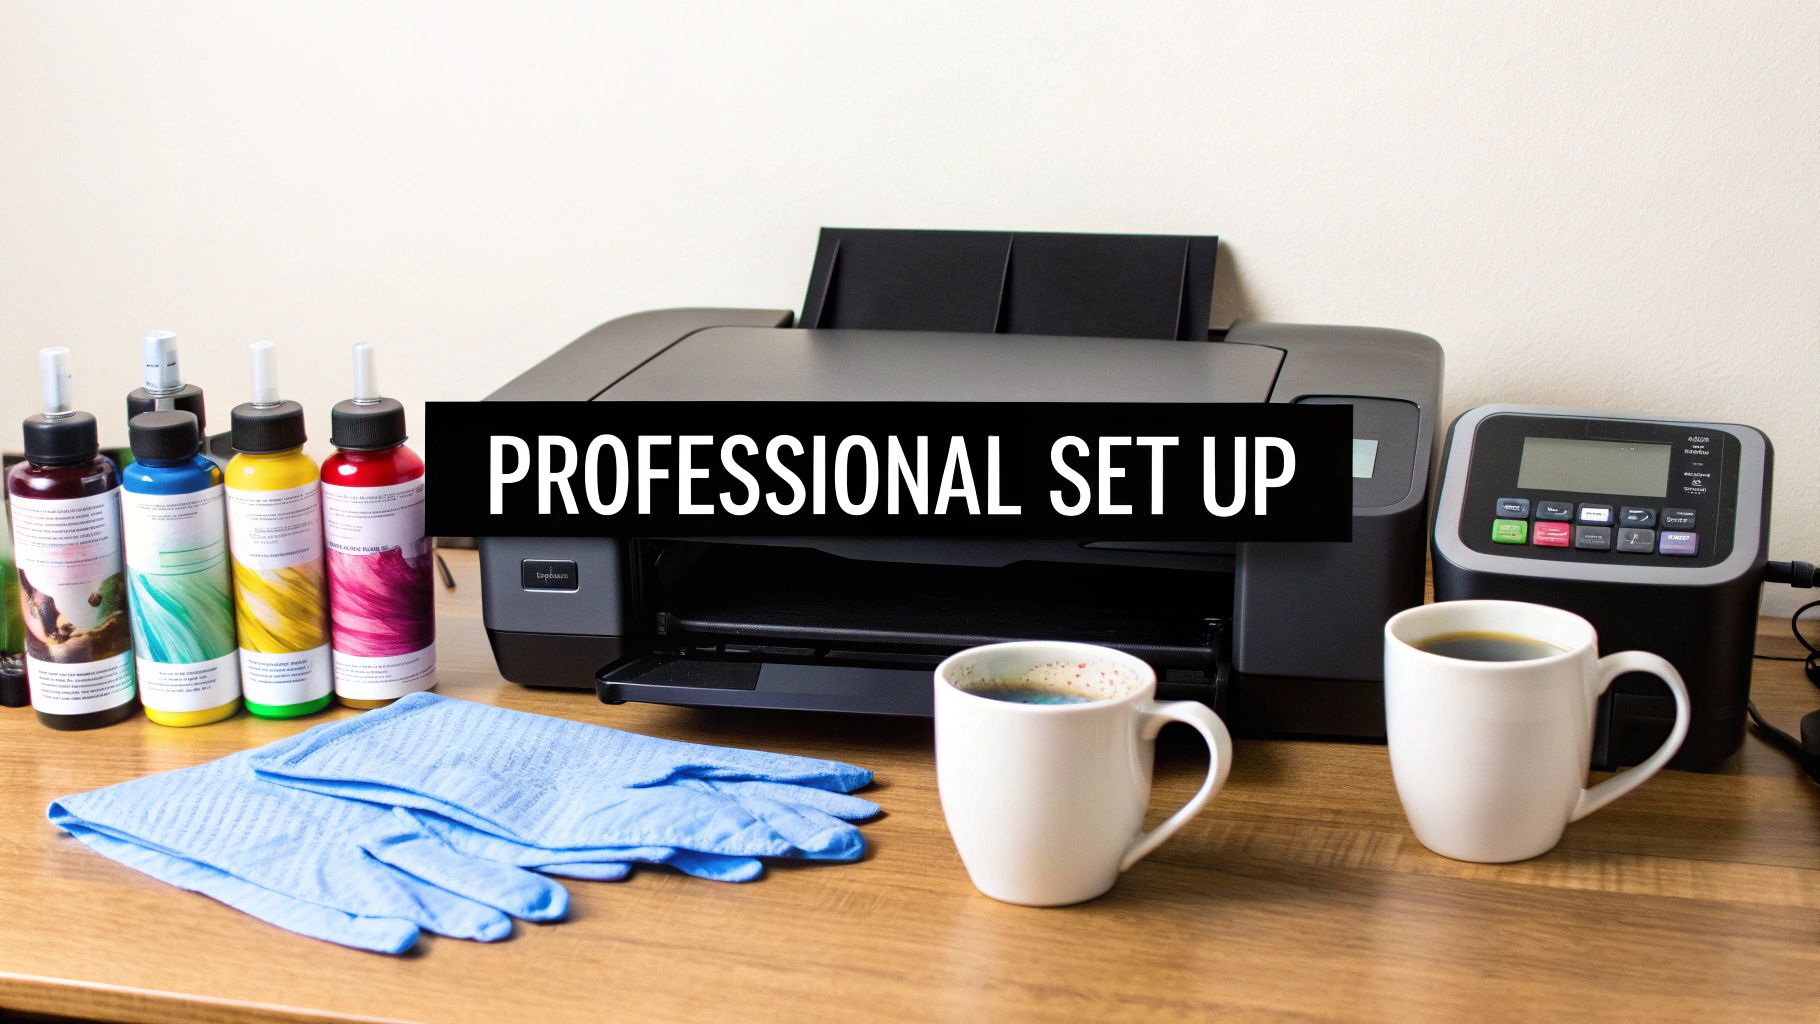
Before you press that first mug, getting your workstation set up correctly is the single most important step. Trying to cut corners here is a fast track to wasted materials, inconsistent colors, and a lot of frustration. This isn't just about ticking items off a shopping list; it’s about understanding why each piece of equipment is crucial for producing sellable, professional-quality products.
Let's dive into the core components that will set your small business or Etsy shop up for success right from the start.
To help you understand the "what" and "why" behind each piece of gear, here is a quick table outlining the essentials.
Essential Equipment for Professional Mug Sublimation
A breakdown of the necessary tools, what to look for in each, and the role they play in achieving high-quality results for your print business.
| Equipment | Key Feature to Look For | Why It Matters for Quality |
|---|---|---|
| Sublimation Printer | Purpose-built for sublimation (e.g., Sawgrass or Epson F-series) | Delivers precise ink droplets and is calibrated for sublimation inks, preventing clogging and ensuring vibrant, accurate colors. |
| Sublimation Ink | Brand-matched to your printer (e.g., SubliJet or UltraChrome DS) | The chemical formula is designed to turn from solid to gas correctly, providing rich, permanent color infusion. Mismatched inks cause poor results. |
| Sublimation Paper | High-release coating | This paper is engineered to release as much ink as possible during heating, leading to a brighter, more saturated final transfer. |
| Heat Press or Oven | Consistent temperature and even pressure | Uneven heating or pressure causes ghosting, fading, or blotchy spots. Consistency is everything for a professional finish. |
| Sublimation Mugs | Labeled "sublimation-ready" with a polymer coating | This special coating is what the ink bonds with. No coating means no transfer. The quality of this coating directly impacts durability and vibrancy. |
| Heat-Resistant Tape | Withstands high temperatures without leaving residue | Secures your design firmly to the mug, preventing it from shifting during pressing, which is a common cause of blurry or doubled images. |
Choosing quality gear from the get-go saves you countless hours of troubleshooting and money on wasted blanks. Now, let's break these components down a bit further.
The Heart of Your Operation: Your Printer and Ink
The journey to a brilliant, permanent design starts with a dedicated sublimation printer. Let's be clear: you cannot use a standard office inkjet. Sublimation relies on a specific type of ink that turns from a solid into a gas under heat—a chemical process regular inks just can't perform.
Brands like Sawgrass (with their SubliJet inks) or Epson (with their F-series printers and UltraChrome DS inks) are industry standards for good reason. They're engineered to work as a system, giving you consistent, rich colors that truly pop. Investing in a quality printer and ink combo is the secret to avoiding those dreaded muddy, faded, or off-color prints. For a deeper look at what to consider, check out our guide on essential dye sublimation kits.
The Right Heat Source: Mug Press vs. Convection Oven
Once your design is printed, you need a heat source to initiate the sublimation process. Your two main options are a mug press or a dedicated convection oven, and each has its place depending on your production needs.
-
Cylindrical Mug Press: This is the workhorse for most beginners and small shops. It’s a heat press with a curved heating element that wraps snugly around the mug, applying direct, even heat and pressure. It's fantastic for making one perfect mug at a time.
-
Dedicated Convection Oven: If you're planning to scale up, a convection oven paired with silicone mug wraps is a game-changer. The wraps supply the needed pressure, and the oven's circulating hot air lets you sublimate a batch of mugs at once, seriously boosting your output.
Crucial Safety Note: Any oven used for sublimation must be dedicated to crafting and never used for food. The gasses released during the process are not food-safe.
Choosing Your Canvas: The Sublimation-Ready Mug
This is where many newcomers make a costly mistake. Not all white mugs are the same. You can't just grab a pack from a big-box store and expect it to work. For the sublimation process to succeed, the mug absolutely must have a special polymer coating.
This clear coating is what the gaseous sublimation ink bonds with under heat. Without it, the ink has nowhere to go, and your design will either fail to transfer or just wipe right off. As textile specialists, we live by the rule that the quality of the blank is everything, and the same applies here. Always source your mugs from a reputable supplier who clearly labels them as "sublimation ready." It’s the one detail that separates a professional product from a complete failure.
The demand for these custom products is booming. The global sublimation printing equipment market, valued at US$2.7 billion in 2025, is projected to hit US$4.1 billion by 2032. This growth shows just how accessible this technology has become for creative entrepreneurs like you.
Getting Your Artwork Ready for a Flawless Transfer
A truly great-looking mug—the kind that flies off your Etsy shelf or gets rave reviews from a client—doesn't just happen at the heat press. The magic really starts with a perfectly prepped digital design. Think of your artwork file as the foundation; if it's shaky, the final product will be too.
Nailing your artwork setup is about more than just aesthetics. It’s a technical process that ensures the brilliant colors you see in your design software actually show up on a curved, ceramic surface. Skipping these prep steps is a common reason beginners get stuck with faded, blurry, or misaligned mugs.
Color Management and Resolution: The Non-Negotiables
Let's talk color first. If you’ve done any digital design work, you’re probably familiar with the RGB (Red, Green, Blue) color model. For sublimation, you'll want to stick with it. Your printer's driver is specifically built to translate RGB colors into the right ink mix, and designing in CMYK can unexpectedly lead to dull, muddy prints.
The key to getting rich, accurate color is using the right ICC profile. This is a small but powerful file, usually provided by your ink supplier (like Sawgrass or Epson), that essentially teaches your printer how to interpret color correctly. Without it, your printer is just guessing, and that beautiful navy blue in your design might come out looking like a faded purple.
An ICC profile is like a universal translator for your setup. It ensures the colors on your monitor match the final print by accounting for the unique quirks of your specific ink, paper, and printer.
Just as critical as color is clarity. To avoid a pixelated, fuzzy result, you need to create your design at a high resolution. The gold standard for any quality print work, sublimation included, is 300 DPI (dots per inch). If you try to use a low-resolution image, like a 72 DPI graphic from a website, you'll end up with a soft, unprofessional transfer that lacks crisp lines and sharp details.
Sizing and Placing Your Design Like a Pro
With your colors dialed in and your resolution set, it's time to size the artwork to fit the mug. This is where precision really counts. Even being off by a few millimeters can throw the whole look off.
You can use software like Adobe Photoshop, Affinity Designer, or even free options like Canva to build your templates. The first thing you need to do is measure the actual printable area on one of your blank mugs. A standard 11oz mug is usually around 8.5" x 3.75", but it’s always best to measure your specific stock.
Create a new document with those exact dimensions and make sure it's set to 300 DPI. Here are a few professional tips for getting the layout just right:
- Always Add a Bleed: Extend your background about 0.125 inches past your main design area on all sides. This small amount of overflow is your insurance against any white gaps if the wrap isn't perfectly aligned.
- Use Guides for Centering: In your design software, drop vertical guides to mark the center and edges of your focal point. This helps you see exactly how a logo or photo will sit when someone is looking at the mug head-on.
- Remember the Handle: You can't print right up to the handle on either side. Keep your most important design elements away from the far left and right edges of your template so they don't get cut off.
The Most Important Final Check: Mirror Your Image!
This is it. The single most common mistake beginners make in sublimation mug printing, and thankfully, it’s the easiest one to avoid. Before you hit that print button, you absolutely must mirror (or flip horizontally) your design.
The process literally transfers the ink from the paper to the mug's surface. If you print the design as-is, everything on the final mug will be backward—which is a really bad look, especially for text! Every design program has a "flip horizontal" or "mirror image" checkbox. Make it a non-negotiable part of your pre-print checklist.
To make sure you're using the right materials for this crucial step, check out our detailed guide on the best heat transfer paper for your printer.
The Mug Pressing Process From Start to Finish
You've got your artwork mirrored and printed, and now it's time for the transfer. This is where your digital design comes to life on a physical mug. It’s all about getting the heat, pressure, and timing just right. Nail these three, and you'll be pulling vibrant, professional-looking mugs out of your press every single time.
This isn't just a push-button operation; it's a craft. Every detail, from how you clean the blank to how you peel the paper off, impacts the final product. Let's walk through the whole sequence, and we'll share some hands-on tips to help you skip common mistakes and get the crisp, sellable results your customers are going to love.
Preparing the Mug and Transfer
Before a mug goes into your heat press, a little prep work goes a long way. First, grab a lint-free cloth and some isopropyl alcohol. Give the polymer-coated surface a good wipe-down to get rid of any dust, fingerprints, or oils. This simple step is your best defense against those random, discolored specks that can ruin an otherwise perfect print.
Next, you’ll want to trim your mirrored sublimation print, leaving a small border if that works for your design. Wrap it around the mug as tightly as you can, making sure the design is perfectly straight and centered. The paper needs to be absolutely flush against the mug's surface—any wrinkles or air pockets will create faded or blurry patches.
Secure the paper with several pieces of heat-resistant tape at the top, bottom, and along the seam. Don't be stingy with the tape here. The goal is to make sure that paper doesn't shift even a fraction of an inch during pressing. This is how you prevent "ghosting," that annoying blurry shadow that happens when the paper moves.
The simple workflow below is the foundation of a great transfer, all happening before the heat is even on.
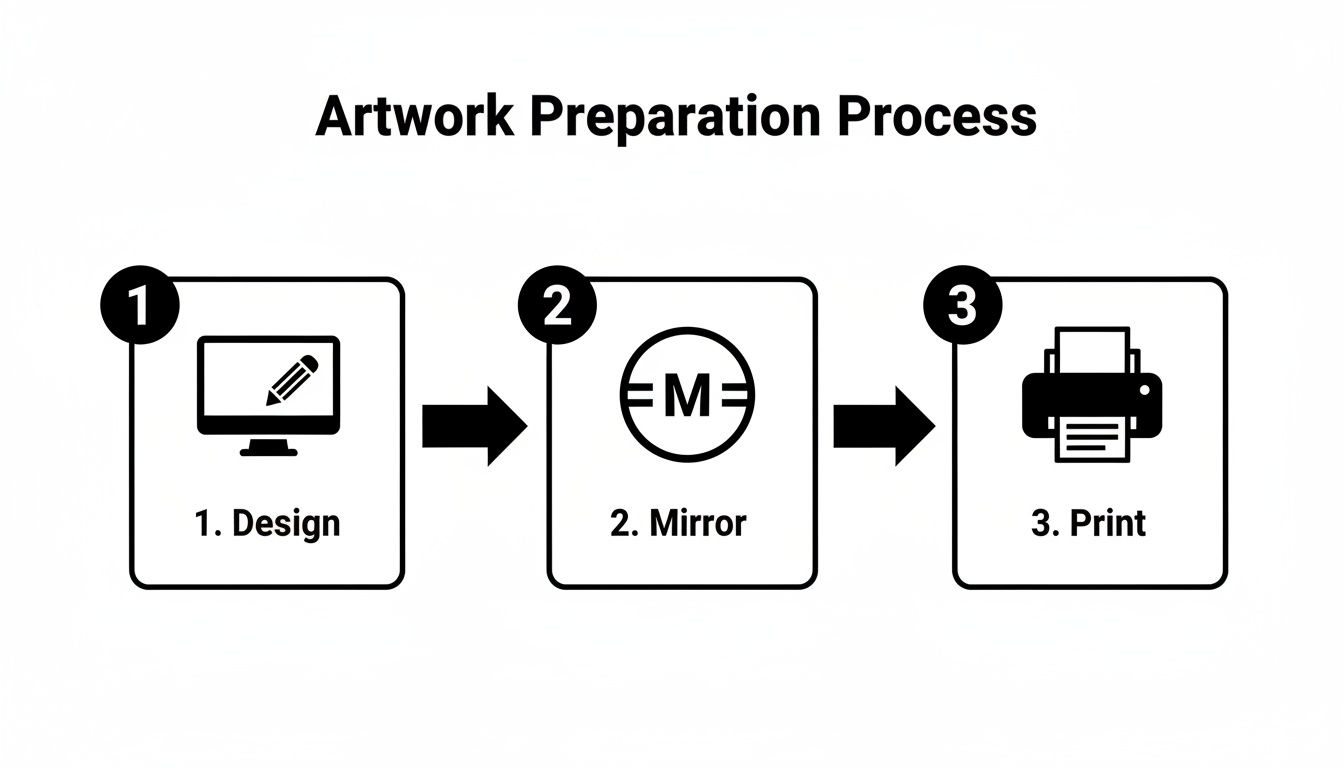
Get these three things right—design, mirror, print—and you're already halfway to a successful press.
Dialing In Your Heat Press Settings
Alright, let's get into the heart of the matter: your press settings. The truth is, there's no single magic number. Your ideal settings will depend on your press, the specific mugs you're using, and even the humidity in your workshop. But you need a solid place to start.
- For Standard 11oz Ceramic Mugs: A great baseline is 385-400°F (196-204°C) for a duration of 180-240 seconds.
- For Stainless Steel Tumblers: These materials usually require a slightly lower temperature, around 350-365°F (177-185°C). They might need more time, though, sometimes up to 6 minutes if you're using a convection oven.
Pressure is the third piece of the puzzle. You’re aiming for firm, even pressure so the paper makes complete contact with the entire design area. When you close the press, it should feel snug, not like you're fighting it. Too little pressure and you'll get faded spots; too much can cause the image to look blown out or, in worst-case scenarios, even break the mug.
Expert Tip: Any time you get a new batch of mugs, sacrifice one for a test print. Run it with your usual settings and see how it comes out. If the colors look a bit weak, bump up the time by 15-20 seconds. Sacrificing one mug is a lot better than ruining a whole case.
The Peel and the Cool-Down
As soon as that timer buzzes, you need to move quickly and safely. Using heat-resistant gloves, open the press and get that incredibly hot mug out of there. Set it on a heat-resistant mat.
Now comes the "hot peel." You want to pull that sublimation paper off immediately while the mug is still very hot. Use one swift, confident motion. If you hesitate or let the paper slide, you risk causing ghosting because the ink is still in its gaseous state and can resettle where you don't want it.
Once the paper is off, you have to cool the mug down to lock in the colors and stop the sublimation process completely. You've got two main ways to do this:
- Air Cooling: The simple approach. Just set the mug on a heat-safe surface and let it cool down to room temperature on its own.
- Water Quenching: Plunge the hot mug into a bucket of lukewarm (never ice-cold) water. This stops the gassing process instantly and can sometimes make the colors pop with a little extra vibrancy.
Mastering this process is your ticket into the booming custom drinkware market. Customized mugs and tumblers are a huge piece of the print-on-demand pie, with the drinkware category making up about 19% of the industry. People want unique, personalized gear, and getting this right lets you deliver a top-notch product. If you're curious, you can explore more print-on-demand statistics on Wix.com.
Troubleshooting Common Sublimation Mug Issues

Even with years of experience, every so often you'll produce a "learning opportunity" mug. It happens to everyone. A tiny shift in the paper, a cold spot on the press, or an invisible speck of dust can derail a perfect print.
The goal isn't to never make a mistake—it's to know exactly what went wrong and how to fix it fast. Let's walk through some of the most common issues so you can spend less time guessing and more time printing.
Blurry Edges or "Ghosting"
You peel back the paper and see a faint, fuzzy shadow right next to your sharp design. That's ghosting, and it's almost always caused by the transfer paper moving while the mug is still hot.
At high temperatures, the ink turns into a gas. If the paper wiggles even a millimeter during or right after pressing, that gas will smudge and re-deposit where it shouldn't.
The fix is all about security. Wrap your design as tightly as you can, pulling it taut against the mug's surface. Use a good quality heat-resistant tape for sublimation to lock it down at the top, bottom, and along the seam. When the timer beeps, be decisive—remove the paper in one smooth, swift motion.
Faded, Blotchy, or Uneven Colors
Does your finished mug look dull, washed-out, or have weird patches of weak color? This points directly to a problem with one of the three pillars of sublimation: temperature, time, or pressure. If the colors aren't popping, it’s because the ink didn't get the right conditions to fully sublimate into the mug's coating.
First, go back to your settings. Are you certain the temperature and time are correct for that specific type of mug? Sometimes, just adding 15-20 seconds to the press time is all it takes to bring the colors to life.
If your settings are spot-on, the next suspect is pressure. If the clamp isn't providing firm, even contact all the way around, you'll get faded areas. Make sure the mug is centered perfectly and that the pressure feels snug and consistent across the entire design.
Pro Tip: Your heat press's display can sometimes be misleading. We always recommend using a handheld infrared thermometer to check for hot or cold spots on the heating element itself. This can instantly explain why one side of a mug looks perfect and the other looks faded.
Tiny Dots or Specks in the Print
This one is frustrating. You have a gorgeous, vibrant print, but it’s ruined by tiny colored specks or white dots. In 99% of cases, the culprit is microscopic debris that was on the mug before you pressed it.
Any little piece of dust prevents the ink from reaching the mug, leaving a tiny white dot. Even worse, a stray fiber of colored lint from your t-shirt can actually sublimate its own dye onto your mug, leaving a random colored speck.
The solution is non-negotiable and simple: clean every single mug. A quick wipe-down with a lint-free cloth and a bit of isopropyl alcohol right before you tape your design on is the best insurance policy against these tiny imperfections.
To make diagnosing these issues even faster, here's a quick-reference table. It's a lifesaver when you're in the middle of a production run and need a fast answer.
Common Mug Printing Problems and Solutions
| Problem (Symptom) | Likely Cause | How to Fix It |
|---|---|---|
| Blurry or doubled edges ("Ghosting") | Transfer paper shifted while hot. | Wrap paper tighter; use more heat tape. Remove paper quickly and cleanly post-press. |
| Faded or dull colors | Incorrect time, temperature, or pressure settings. | Verify your settings for the specific mug type. Increase press time by 15-20 seconds or slightly increase pressure. |
| Uneven or blotchy color patches | Uneven pressure or cold spots in the heat press. | Adjust mug press for consistent pressure. Check heating element for accuracy with an infrared thermometer. |
| Tiny white dots or colored specks | Dust, lint, or debris on the mug's surface before pressing. | Clean every mug with a lint-free cloth and isopropyl alcohol before applying the transfer. |
| Yellow or brown "staining" on white areas | Temperature is too high or the pressing time is too long. | Reduce temperature by 5-10°F or shorten the press time by 10-15 seconds. |
Turning a failed print into a lesson is how you master the craft. By recognizing these symptoms and knowing the cause, you'll be able to adjust on the fly, saving time, money, and frustration.
Scaling Up Your Mug Business & Keeping Customers Happy
Nailing that first perfect mug feels amazing. But then the real fun begins: an order for 50 wedding favors or 100 mugs for a local coffee shop. Suddenly, your one-by-one method looks like a serious roadblock. This is where you learn to work smarter, not harder.
Scaling your sublimation workflow is all about batching. Don't think of it as making 50 individual mugs; think of it as one big project with distinct phases. Print all your transfer sheets in one go. Then, sit down and trim them all. This assembly-line mindset saves a ton of time and keeps you from constantly switching gears.
Going From a Single Mug to Big Batches
A tidy workspace is a productive workspace. Set up dedicated stations: one for cleaning mugs and taping on transfers, one for your heat press, and a separate, safe area where hot mugs can cool down. This simple organization prevents dust from ruining a blank mug and keeps the whole process feeling calm and controlled.
At some point, if things go well, your single-mug press just won't cut it anymore. That's a great problem to have, and it means you're ready to level up your gear.
- Multi-Mug Press: These are fantastic. You can find presses that handle two, four, or even five mugs at once. They'll dramatically boost your output without changing your core process too much.
- Convection Oven: For true batch production, a dedicated convection oven combined with silicone mug wraps is the gold standard. You can sublimate a dozen or more mugs in a single run, which is a game-changer for fulfilling large corporate or event orders.
The trick is to invest when your orders justify the expense. Upgrading your equipment is what allows you to confidently accept those bigger, more profitable jobs. And the demand is definitely there—the global dye sublimation market is expected to rocket from $16.85 billion in 2026 to $28.05 billion by 2031. If you like keeping an eye on trends, you can explore more sublimation product insights on Accio.com.
A Little Care Goes a Long Way
Your work isn't finished when the mug comes out of the press. Providing simple, clear care instructions is the final professional touch that protects your art and keeps your customers happy.
We always recommend including a small care card with every order. It takes two seconds, adds a ton of value, and prevents those "my mug faded!" emails down the line. It shows you're a professional who stands behind your product.
High-quality sublimation mugs are tough, but they aren't indestructible. Here are the key tips to share with every single customer:
- Dishwasher Safe (Top Rack!): The print is permanent, but the intense heat and harsh detergents on a dishwasher's bottom rack can cause fading over time. Always recommend the top rack for the best results.
- Microwave Safe: Yes, they're perfectly safe to microwave. The sublimated design won't be affected at all.
- Avoid Abrasives: For those who prefer hand-washing, suggest using a soft sponge. Steel wool or abrasive cleaners can scratch the glossy coating over time.
Giving your customers this guidance ensures they can enjoy their vibrant, custom mugs for years. It's that last little step that turns a great product into a five-star experience.
Got Questions About Sublimation Mugs? We've Got Answers.
When you're first getting into sublimation, a million questions pop up. It’s completely normal. We hear from makers and small business owners every day who are troubleshooting the exact same things. So, let's walk through some of the most common hurdles to get you past the learning curve and on to making mugs you can't wait to sell.
Why Do My Mugs Look Faded and Washed Out?
This is, without a doubt, the number one frustration for beginners. If your colors look dull instead of vibrant, it almost always boils down to one of three culprits: time, temperature, or the mug itself. Get one of these wrong, and the whole print suffers.
First, take a hard look at your heat press settings. Most ceramic mugs need to be pressed at 385-400°F (195-205°C) for a good 180-240 seconds. If your press is too cool or you don't give it enough time, the sublimation ink just can't do its job—it won't turn into a gas and fully infuse into the mug's coating.
Next up is pressure. You need solid, even pressure across the entire design. If it's too light, the paper can't make proper contact, which leads to blotchy, weak-looking colors. And finally, make sure you're using proper sublimation blanks. A regular mug won't work because it doesn't have the special polymer coating that the ink needs to bond to. The image will look faint and you'll be able to just wipe it right off.
Can I Just Use My Kitchen Oven Instead of a Mug Press?
You absolutely can! Using a convection oven is a fantastic way to sublimate, especially when you need to make more than one mug at a time. But there's a huge, non-negotiable rule here: this oven must be dedicated only to sublimation. Never, ever use the same oven you cook food in. The sublimation process releases fumes that are not food-safe.
To make it work, you'll need a set of silicone mug wraps. These wraps are what provide the firm, even pressure to hold your transfer paper tightly against the mug, basically doing the job of the press.
The real win with an oven is batching. You can sublimate a bunch of mugs at once, which is a total lifesaver for big orders. A good starting point is usually around 400°F (205°C) for 12-15 minutes, but you’ll need to run a few tests to nail down the perfect recipe for your specific oven and wraps.
What Is "Ghosting" and How Do I Stop It?
Ever seen a faint, blurry shadow along the edges of your design? That's ghosting. It happens when the sublimation paper shifts just a tiny bit while the mug is still scorching hot and the ink is in its gas state. Any little movement can cause that ink-gas to settle back onto the mug in the wrong spot, creating that annoying double image.
Fortunately, preventing it is pretty straightforward:
- Tape it down well: Use good heat-resistant tape to secure your transfer paper. Don't be shy with it—make sure the paper is pulled taut with no gaps or wrinkles.
- Peel it fast: As soon as that timer buzzes, get the mug out of the press and peel the paper off immediately. The key is to do it in one swift, clean motion. Don't let the paper slide across the surface.
Do I Really Need to Buy Special Ink and Paper?
Yes, 100%. This is one area where there are no shortcuts. The magic of sublimation is all in the chemistry. That special dye ink is designed to turn into a gas under heat, allowing it to permanently bond with the polymer coating on your mug.
If you try to use regular inkjet ink from your office printer, you'll just get a wet, smudgy mess that never becomes permanent. The same goes for paper. Sublimation paper has a unique coating that's engineered to release as much of that ink-gas as possible when heated. Plain copy paper will just trap the ink, leaving you with a dull, faded, and totally unsellable product. Investing in a quality sublimation ink and paper system isn't just a suggestion—it's the foundation of the entire craft.
At Spark Blank Textiles, we're experts in sourcing premium materials that help makers create brilliant, lasting products. While our specialty is high-quality sublimation blankets and towels, we know the principle is universal: great results start with great materials. For all your premium textile needs, from cozy sherpa to elegant woven tapestry, explore our curated collection at sparkblanktextiles.com.


